SPARE PARTS
- Stationary Crushers
- Grinding Mill
- Washing & Screening
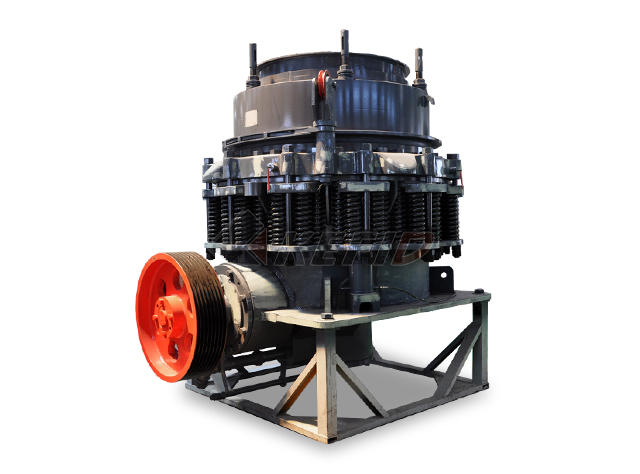
CS series cone crusher
Cs series high effect spring cone crusher, also called the combined type cone crusher, is the high performance cone crusher which was deviloped by Kefid Comany with the US-technology for years. It has the advantage of many types crushing cavity, high efficient crushing work, long work life, low manitenance consumption, etc.
-
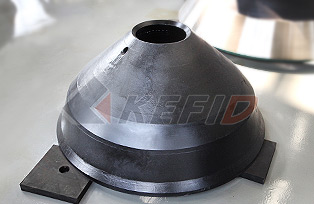
MANTLE
Material : ZGMn13-4
Function : mantle cover the cone body, concave wall fixed on the inside of adjusting ring, they are the main working part of the cone crusher. The feeding material go through the two parts and were broken by the mantle .
-
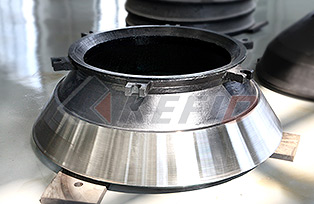
CONCAVE WALL
Material : ZGMn18
Function : Rolling mortar wall hanging beneath the adjustment ring, With the broken wall rotating extrusion material so as to achieve the suitable particle size.
-

DOWN RING
Material : cast steel/Q235-A
Function : Down ring is used to lock the cone head, and functioned as a buffering and connection lock nut and the frame body.
-

LOCK NUT
Material : ZG270-500/ZG35SiMn
Function : Lock nut is at the very top, work as a screw nut, and to make sure the steadiness of the shaft and movable cone.
CHANGE THE MANTLE:
1. inserted in the hole on the top of the spindle sleeve with an steel rod, using a sledgehammer force or counter-clockwise to loosen the spindle sleeve.
2. due to the main shaft bush will be locked by itself when working and has the tendency of pressing the mantle , it may facing difficulties when dismantling the main bush. If so, cut the cutting ring which is under the main bush to reduce the press of the screw thread when dismantling the main bush. Don’t need to cut through the cutting ring at most time. Because the cutting ring will be pressed flat when cutting all around the cutting ring. Do not the main shaft.
3. hang the mantle away from the moving cone department with steel rope.
4. remove the packing stuck on the moving cone body, In order to facilitate the replacement of a new after changing crushing wall add new packing. Note: if you replace the broken wall, you should refill filler.
CHANGE THE CONCAVE WALL:
1. Hanging out the feeding hopper, to create the conditions for dismantling U-bolts which is fastening concave wall .
2. Remove the rectangular lock washers. With special screw wrench and a steel bar as a lever, remove the bowl on the U-shaped nut screw, then remove the screws.
3. hanging the adjustment away the bowl. If the adjustment kit of concave wall hook surface did not handle well, concave wall may be stuck in the adjustment sleeve by filler. If the bowl with the adjustment sleeve to stick together, tamping down vertically on top concave wall hook, hook to loosen the filler opening.
4. Shovel out the residual adjustment sleeve filler. Fillers usually only stick concave wall, and rarely stick to adjust the sleeve.
5. Check whether the apron bearing kit wear and damage or not, because the seal is to prevent the infiltration of dust contamination when crusher bearing sleeve adjustment sleeve and wedge and adjust the work area with the cylinder.
CHANGE THE WORN CONCAVE WALL:
1. Dismantle the adjustment ring from the support sleeve.
2. Clean the support units, adjustment ring and locking nut threads thoroughly.
3. Lift to feed box from the adjustment ring.
4. Dismantle the cotter that is used to fix locking plate on the wedge, and then hanging out the locking plate.
5. Hanging the adjustment ring away from the liner.
6. Remove all packing traces on the adjustment ring.
CHANGE THE BOWEL TILE:
1. put the diamantled bowel bearing frame upside down on the kids, this is in order to prevent damage to flange edge.
2. Use a wooden hammer hammering around the lower edge of the bowl and gently hammer the bowl watt watt pressed out. Be careful not to hit just one location, in order to avoid distortion bowl watts.
3. turn over the bowel tile, alignment the new bowel tile with locating pin on the bowel bearing frame. Change the worn pin if necessary. These pins can prevent the bowel from rotating when the push tile interference bowl.
4. If the bowl with the bowl bracket tile presents an interference fit, the block directly on a tile with an upper surface of the bowl, using a sledgehammer to knock the block ram, each tile knock bowl near its final position point. Turns around the inner diameter of the bowl should tap on the tile opposite point. Prevent bowl tile deformation.
5. Pouring Parr bearing alloys into the pin hole after the bowel is located well.